Make Your Own Hot Pack with Rice
I've been meaning to buy a hot water bottle for the past year. Once that time of month rolls around, I always wish I had one. This week, I decided I would make a microwavable hot pack of rice instead of a hot water bottle - it's less messy and more fun to make.
I used the sweet little bear from the Therapy Packs Embroidery + SVG Collection to add to the front of the hot pack. You can use appliqué fabric in this design over the bear's face, but I decided to not use appliqué for this project.
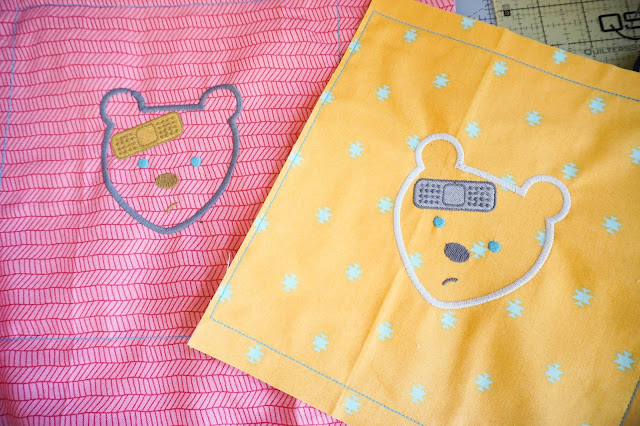
This is actually the first project I have made in my new sewing room since I moved to Texas! This is an exciting project for me. It took me two days to get things tested out and set up the way I wanted it. Long story short, I made some mistakes along the way and learned from them. My first mistake was not using a topper when I stitched out the design the first time. Here's the difference:
You can tell that the stitches on the pink fabric just don't look as good as the final design on the yellow. You. Need. TOPPER! Topper has become my new best friend. It creates a space in between the fabric and thread so your embroidery doesn't sink into the fabric and look like the first design. Using Embellish® Rinse-Away Clear Topper made my stitches raised and look professional. I also used Embellish® Matte Thread for this project. I love the way the matte thread looks. It gives the embroidery a vintage-y feel.
See if you can spot the next mistake I made:
If you decide to use this design without the appliqué, open the design in Embellish Maker and delete colors 1, 2, 3, 4, 9, and 10. This will get rid of the circles that you won't be needing.
Click here to find an independent Embellish® Dealer near you.
I used the sweet little bear from the Therapy Packs Embroidery + SVG Collection to add to the front of the hot pack. You can use appliqué fabric in this design over the bear's face, but I decided to not use appliqué for this project.
This is actually the first project I have made in my new sewing room since I moved to Texas! This is an exciting project for me. It took me two days to get things tested out and set up the way I wanted it. Long story short, I made some mistakes along the way and learned from them. My first mistake was not using a topper when I stitched out the design the first time. Here's the difference:
You can tell that the stitches on the pink fabric just don't look as good as the final design on the yellow. You. Need. TOPPER! Topper has become my new best friend. It creates a space in between the fabric and thread so your embroidery doesn't sink into the fabric and look like the first design. Using Embellish® Rinse-Away Clear Topper made my stitches raised and look professional. I also used Embellish® Matte Thread for this project. I love the way the matte thread looks. It gives the embroidery a vintage-y feel.
See if you can spot the next mistake I made:
I put my embroidery hoop on the wrong way. Good job, Olivia! All joking aside, I'm human and we all mess up. It's important to learn from your mistakes so that you won't make them next time! I am a new embroiderer and am learning from all my mistakes. It's okay, just laugh it off and keep on truckin'.
If you decide to use this design without the appliqué, open the design in Embellish Maker and delete colors 1, 2, 3, 4, 9, and 10. This will get rid of the circles that you won't be needing.
Once I removed the circles you see above, I saved the design and transferred it to my machine with a USB stick. To begin, fuse Embellish® Fusible Dissolvable Tearaway to the back of your fabric. Make sure you use a low heat setting on your iron and don't touch the iron directly to the stabilize. Iron from the fabric side. When hooping, cut your stabilizer one inch larger than your hoop to ensure proper stabilization. Before you start embroidering, lay a piece of Embellish® Rinse-Away Clear Topper over your fabric.
After the design is finished embroidering, remove the stabilizer by tearing it away from the fabric. I used the Embellish® Vinyl Weeding Tool to remove the stabilizer from the back of the bear.
You can use the Embellish® Vinyl Weeding Tool again to remove the topper from the front of the bear. Once al the stabilizer and topper is removed, cut out an 8" x 8" square of fabric for the back and lay the two right sides together. Stitch around all four edges leaving a hole in the middle of the top edge so you can put your rice in. After your hot pack has been sewn, turn it right sides out and start filling with rice. It's easier if you have a funnel to pour the rice in. I had some dried lavender and chamomile buds already, so I decided to add those to the rice mixture.
Once you are done filing your hot pack, hand-sew the gap closed. I actually don't have a hand sewing needle, so I just used my machine. Make sure yo don't over stuff the rice pack so it's easier to sew the hole closed. Your new hot pack is now ready for use! I microwave mine in 15 second intervals until it gets hot enough. I loved that the lavender and chamomile made the hot pack relaxing to use because it smells like lavender.
 |
| my cute little helper |


Comments