DIY Urban Outfitters Decor with Embellish® Dimensional Embroidery Foam
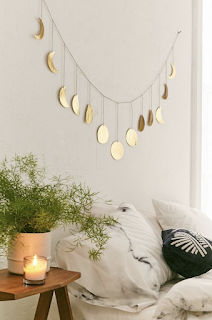
This week I was inspired by these cute wall hangings I've seen everywhere on Pinterest. You can buy them at Urban Outfitters for about $40. I'm going to make one today for way less!
I went ahead and used the built-in shapes on my ScanNCut and cut out half circles and circles in various sizes. I used the following settings on my ScanNCut to cut the 2mm foam:
Standard Blade
Blade at 12
Cut Pressure 9
Cut speed 1
For the supplies you're going to need Embellish® Dimensional Embroidery Foam, acrylic paint or spray paint, a paint brush, RNK Stitch Perfection Tape, Embellish® Vinyl Weeding Too, Embroidery Perfection Tape, and string or a chain. You can also use a wooden dowel to hold up your wall hanging, but I decided to just tie a loop with my string at the top.
I am using Embellish® Dimensional Embroidery Foam in 2mm for this project today. I love using this foam because when we paint it later, the paint will stick to the surface. I love this foam because it is made with closed cells that you can wash, use heat on, and cut on a digital cutter. It requires no prep work so we can get straight to painting! I used some metallic gold acrylic paint and did two coats on each side.
photos from urbanoutfitters.com
I went ahead and used the built-in shapes on my ScanNCut and cut out half circles and circles in various sizes. I used the following settings on my ScanNCut to cut the 2mm foam:
Standard Blade
Blade at 12
Cut Pressure 9
Cut speed 1
For the supplies you're going to need Embellish® Dimensional Embroidery Foam, acrylic paint or spray paint, a paint brush, RNK Stitch Perfection Tape, Embellish® Vinyl Weeding Too, Embroidery Perfection Tape, and string or a chain. You can also use a wooden dowel to hold up your wall hanging, but I decided to just tie a loop with my string at the top.
I am using Embellish® Dimensional Embroidery Foam in 2mm for this project today. I love using this foam because when we paint it later, the paint will stick to the surface. I love this foam because it is made with closed cells that you can wash, use heat on, and cut on a digital cutter. It requires no prep work so we can get straight to painting! I used some metallic gold acrylic paint and did two coats on each side.
I let my foam pieces dry overnight. The next morning I played around with different layouts of my shapes and whole punched the top of each shape while they were laid out in order. You can use a chain or some twine for this next step. I had some string laying around so I decided to use that. You're going to string each shape through the hole until you get to the bottom. I wanted to secure the string so that the shapes wouldn't shift around once I hung it up. I grabbed my RNK Stitch Perfection Tape and applied the tape on the backside of the foam. I used my trusty Embellish® Vinyl Weeding Tool to help me lift up the paper on the tape and pressed the string firmly down. This helps to secure the string so that the shapes won't slide around. I didn't want to use hot glue here because I didn't want those pesky little strings hanging around. I also used a little Embroidery Perfection Tape to secure down the top string to create a loop.
Once your tape is all secured, you're all set and ready to hang your wall hanging! You could really do so much with this project. The Embellish® Dimensional Embroidery Foam is perfect for making mobiles, wall hangings, cat toys, and more.


Comments