Noel Ornaments
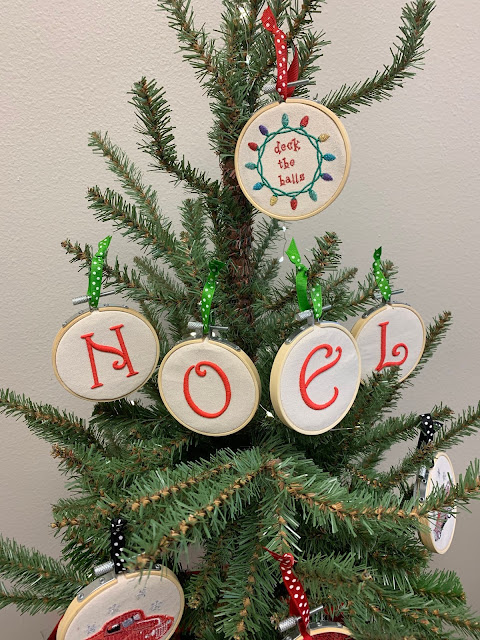
Hi all! Christmas is just around the corner and I have one final ornament DIY for you all this week. We are going to be making four separate ornaments in this video that all spell out 'Noel'. This is such a cute idea, and you could elevate this project and make a wreath out of these mini wooden hoops.
To start, I am embroidering our letters over Embellish® 2mm Dimensional Embroidery Foam. This foam is going to raise our stitches and give it added visual interest. Cut squares out of foam and I like to gently hold the foam on embroidery hoop until the stitches catch and hold it in place. I'm using Embellish® Matte Thread for my lettering. This matte thread gives my letters a vintage feel and elevates my design.
Repeat this step until you have all your letters stitched out. You can stitch out all the letters on the same piece of fabric, just make sure you leave enough room in between each letter. About five inches or more should be left in between each letter since we are using three inch wooden hoops to make our ornaments.
Pro tip: use the Embellish® Vinyl Weeding Tool to help take off the excess foam once your letters are all stitched out.
Cut all of the letters out of of the fabric into five to six inch squares. I am taking my three inch wooden hoops and loosening the tension on the hoops so it's easier to sandwich the fabric in between the two hoops. When you're done assembling, you can tighten the hoop back up.
 Next I'm going around the inside of the back hoop with RNK Stitch Perfection Tape. I'm adding this tape so that the excess fabric around the back of the hoop will stay in place. I love using this double-sided sticky tape for projects. I precut some 3.25" diameter circles out of Dimensional Embroidery Foam to help clean up the back of the ornament. Make sure that you cut your circles to be about .25" larger than the diameter of your hoop. I'm using some hot glue around the edges of the foam circle to attach it to the back of my wooden hoop. This hides the underside of the fabric, and the edges of the fabric are already lying flat around the hoop thanks to the tape I used.
All that we need to do now is make the ornament ready to hang on the tree! I am threading some fun polka dot ribbon through the top of my hoop and tying it at the ends. You could also use twine or embroidery floss.
Embellish® and RNK products make crafting sew much easier! The products I have hi-lighted above are available exclusively through RNK Distributing.
To start, I am embroidering our letters over Embellish® 2mm Dimensional Embroidery Foam. This foam is going to raise our stitches and give it added visual interest. Cut squares out of foam and I like to gently hold the foam on embroidery hoop until the stitches catch and hold it in place. I'm using Embellish® Matte Thread for my lettering. This matte thread gives my letters a vintage feel and elevates my design.
Repeat this step until you have all your letters stitched out. You can stitch out all the letters on the same piece of fabric, just make sure you leave enough room in between each letter. About five inches or more should be left in between each letter since we are using three inch wooden hoops to make our ornaments.
Pro tip: use the Embellish® Vinyl Weeding Tool to help take off the excess foam once your letters are all stitched out.
Cut all of the letters out of of the fabric into five to six inch squares. I am taking my three inch wooden hoops and loosening the tension on the hoops so it's easier to sandwich the fabric in between the two hoops. When you're done assembling, you can tighten the hoop back up.
 Next I'm going around the inside of the back hoop with RNK Stitch Perfection Tape. I'm adding this tape so that the excess fabric around the back of the hoop will stay in place. I love using this double-sided sticky tape for projects. I precut some 3.25" diameter circles out of Dimensional Embroidery Foam to help clean up the back of the ornament. Make sure that you cut your circles to be about .25" larger than the diameter of your hoop. I'm using some hot glue around the edges of the foam circle to attach it to the back of my wooden hoop. This hides the underside of the fabric, and the edges of the fabric are already lying flat around the hoop thanks to the tape I used.
All that we need to do now is make the ornament ready to hang on the tree! I am threading some fun polka dot ribbon through the top of my hoop and tying it at the ends. You could also use twine or embroidery floss.
Embellish® and RNK products make crafting sew much easier! The products I have hi-lighted above are available exclusively through RNK Distributing.
Click here to find an independent Embellish Dealer near you.


Comments